第六篇 : 分布式配置中心(Spring Cloud Config)
一、简介
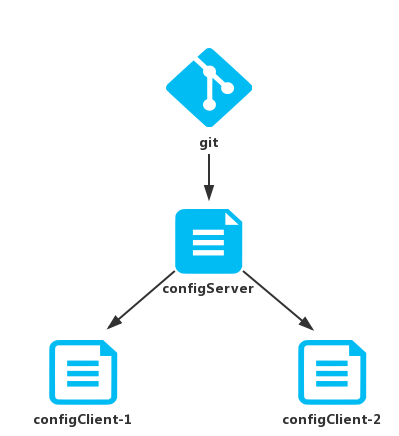
在分布式系统中,由于服务数量巨多,为了方便服务配置文件统一管理,实时更新,所以需要分布式配置中心组件。在Spring Cloud中,有分布式配置中心组件spring cloud config ,它支持配置服务放在配置服务的内存中(即本地),也支持放在远程Git仓库中。在spring cloud config 组件中,分两个角色,一是config server,二是config client。
二、构建Config Server
1. 父级工程
父maven工程省略,父pom文件:
<?xml version="1.0" encoding="UTF-8"?>
<project xmlns="http://maven.apache.org/POM/4.0.0" xmlns:xsi="http://www.w3.org/2001/XMLSchema-instance"
		 xsi:schemaLocation="http://maven.apache.org/POM/4.0.0 http://maven.apache.org/xsd/maven-4.0.0.xsd">
	<modelVersion>4.0.0</modelVersion>

	<groupId>com.gf</groupId>
	<artifactId>chapter06</artifactId>
	<version>0.0.1-SNAPSHOT</version>
	<packaging>pom</packaging>

	<name>chapter06</name>
	<description>Demo project for Spring Boot</description>

	<parent>
		<groupId>org.springframework.boot</groupId>
		<artifactId>spring-boot-starter-parent</artifactId>
		<version>2.0.5.RELEASE</version>
		<relativePath/> <!-- lookup parent from repository -->
	</parent>

	<modules>
		<module>config-server</module>
		<module>config-client</module>
	</modules>

	<properties>
		<project.build.sourceEncoding>UTF-8</project.build.sourceEncoding>
		<project.reporting.outputEncoding>UTF-8</project.reporting.outputEncoding>
		<java.version>1.8</java.version>
		<spring-cloud.version>Finchley.SR1</spring-cloud.version>
	</properties>

	<dependencyManagement>
		<dependencies>
			<dependency>
				<groupId>org.springframework.cloud</groupId>
				<artifactId>spring-cloud-dependencies</artifactId>
				<version>${spring-cloud.version}</version>
				<type>pom</type>
				<scope>import</scope>
			</dependency>
		</dependencies>
	</dependencyManagement>

	<build>
		<plugins>
			<plugin>
				<groupId>org.springframework.boot</groupId>
				<artifactId>spring-boot-maven-plugin</artifactId>
			</plugin>
		</plugins>
	</build>


</project>
2. 创建 config-server
创建一个spring-boot项目,取名为config-server,其pom.xml如下:
<?xml version="1.0" encoding="UTF-8"?>
<project xmlns="http://maven.apache.org/POM/4.0.0" xmlns:xsi="http://www.w3.org/2001/XMLSchema-instance"
	xsi:schemaLocation="http://maven.apache.org/POM/4.0.0 http://maven.apache.org/xsd/maven-4.0.0.xsd">
	<modelVersion>4.0.0</modelVersion>

	<groupId>com.gf</groupId>
	<artifactId>config-server</artifactId>
	<version>0.0.1-SNAPSHOT</version>
	<packaging>jar</packaging>

	<name>config-server</name>
	<description>Demo project for Spring Boot</description>

	<parent>
		<groupId>com.gf</groupId>
		<artifactId>chapter06</artifactId>
		<version>0.0.1-SNAPSHOT</version>
	</parent>

	<dependencies>
		<dependency>
			<groupId>org.springframework.boot</groupId>
			<artifactId>spring-boot-starter-web</artifactId>
		</dependency>
		<dependency>
			<groupId>org.springframework.cloud</groupId>
			<artifactId>spring-cloud-config-server</artifactId>
		</dependency>

		<dependency>
			<groupId>org.springframework.boot</groupId>
			<artifactId>spring-boot-starter-test</artifactId>
			<scope>test</scope>
		</dependency>
	</dependencies>


</project>
3. 主启动类 ConfigServerApplication
在程序的入口Application类加上@EnableConfigServer注解开启配置服务器的功能,代码如下:
package com.gf;

import org.springframework.boot.SpringApplication;
import org.springframework.boot.autoconfigure.SpringBootApplication;
import org.springframework.cloud.config.server.EnableConfigServer;

@SpringBootApplication
@EnableConfigServer
public class ConfigServerApplication {

	public static void main(String[] args) {
		SpringApplication.run(ConfigServerApplication.class, args);
	}
}
4. application.yml
#spring.cloud.config.server.git.uri:配置git仓库地址
#spring.cloud.config.server.git.searchPaths:配置仓库路径
#spring.cloud.config.label:配置仓库的分支
#spring.cloud.config.server.git.username:访问git仓库的用户名
#spring.cloud.config.server.git.password:访问git仓库的用户密码

spring:
  application:
    name: config-server
  cloud:
    config:
      server:
        git:
          uri: https://github.com/gf-huanchupk/SpringCloudLearning/
          search-paths: respo
          username:
          password:
      label: master
server:
  port: 8888
如果Git仓库为公开仓库,可以不填写用户名和密码,如果是私有仓库需要填写,本例子是公开仓库,放心使用。
远程仓库https://github.com/forezp/SpringcloudConfig/respo 中有4个文件:
- config-server.yml
- config-server-dev.yml
- config-server-prod.yml
- config-server-test.yml
启动程序:访问http://localhost:8888/config-client/test/master
{
  "name": "config-server",
  "profiles": [
    "test"
  ],
  "label": "master",
  "version": "906df28472293c91d6b7223274bfc3e772a7027b",
  "state": null,
  "propertySources": [
    {
      "name": "https://github.com/gf-huanchupk/SpringCloudLearning//respo/config-server-test.yml",
      "source": {
        "foo": "test",
        "democonfigclient.message": "hello spring io"
      }
    },
    {
      "name": "https://github.com/gf-huanchupk/SpringCloudLearning//respo/config-server.yml",
      "source": {
        "foo": "main",
        "democonfigclient.message": "hello spring io"
      }
    }
  ]
}
http请求地址和资源文件映射如下:
- /{application}/{profile}[/{label}]
- /{application}-{profile}.yml
- /{label}/{application}-{profile}.yml
- /{application}-{profile}.properties
- /{label}/{application}-{profile}.properties
三、构建一个config client
1. 创建 config-client
重新创建一个springboot项目,取名为config-client,其pom文件:
<?xml version="1.0" encoding="UTF-8"?>
<project xmlns="http://maven.apache.org/POM/4.0.0" xmlns:xsi="http://www.w3.org/2001/XMLSchema-instance"
	xsi:schemaLocation="http://maven.apache.org/POM/4.0.0 http://maven.apache.org/xsd/maven-4.0.0.xsd">
	<modelVersion>4.0.0</modelVersion>

	<groupId>com.gf</groupId>
	<artifactId>config-client</artifactId>
	<version>0.0.1-SNAPSHOT</version>
	<packaging>jar</packaging>

	<name>config-client</name>
	<description>Demo project for Spring Boot</description>

	<parent>
		<groupId>com.gf</groupId>
		<artifactId>chapter06</artifactId>
		<version>0.0.1-SNAPSHOT</version>
	</parent>

	<dependencies>
		<dependency>
			<groupId>org.springframework.boot</groupId>
			<artifactId>spring-boot-starter-web</artifactId>
		</dependency>
		<dependency>
			<groupId>org.springframework.cloud</groupId>
			<artifactId>spring-cloud-starter-config</artifactId>
		</dependency>

		<dependency>
			<groupId>org.springframework.boot</groupId>
			<artifactId>spring-boot-starter-test</artifactId>
			<scope>test</scope>
		</dependency>
	</dependencies>


</project>
2. bootstrap.yml
application.yml 改名为 bootstrap.yml
#spring.application.name 这里的name对应了配置文件中的application部分
#spring.cloud.config.label 指明远程仓库的分支
#spring.cloud.config.profile
#  dev开发环境配置文件
#  test测试环境
#  pro正式环境
#spring.cloud.config.uri= http://localhost:8888/ 指明配置服务中心的网址。

spring:
  application:
    name: config-client
  cloud:
    config:
      label: master
      profile: dev
      uri: http://localhost:8888/
server:
  port: 8881
3. 主程序启动类 ConfigClientApplication
程序的入口类,写一个API接口 " /hi ",返回从配置中心读取的foo变量的值,代码如下:
package com.gf;

import org.springframework.beans.factory.annotation.Value;
import org.springframework.boot.SpringApplication;
import org.springframework.boot.autoconfigure.SpringBootApplication;
import org.springframework.web.bind.annotation.GetMapping;
import org.springframework.web.bind.annotation.RestController;

@SpringBootApplication
@RestController
public class ConfigClientApplication {

	public static void main(String[] args) {
		SpringApplication.run(ConfigClientApplication.class, args);
	}

	@Value("${foo}")
	String foo;

	@GetMapping("/hi")
	public String hi() {
		return foo;
	}

}
打开网址访问:http://localhost:8881/hi,网页显示:
dev
这就说明,config-client 从 config-server获取了 foo 的属性,而 config-server 是从git仓库读取的,如图:


评论